

More and more people are learning English every day. Still, there is a huge number of people who don’t understand or speak English. Although you have a compelling app, people may not use it. They might not know English or prefer it to be available in their language.
You may be losing the game in non-English regions, no matter how much the app can benefit them. For example, if you have an app that tells the steps to perform the particular exercise and if a user is unable to understand the language, the user will simply opt for another app (which might be mediocre but available in the user’s language)
If you are developing a mobile app and want it to succeed at the global level, you must consider Internationalizing and localizing your Flutter app.
In this tutorial, we’ll learn an easy way to implement the Internationalization and Localization in the Flutter app by walking through some practical examples.
Here’s what we’ll cover:
- What is Localization
- What is Internationalization
- Internationalizing step by step
- String with Parameters
- String with Numbers
- String with Currencies
- String with Dates
- String with Plurals
Do you want to stay updated in Flutter world? Please click on subscribe button to get an email when the new tutorial is published or visit the https://flutterbeads.com
What is Localization
Localizing the app meaning, making it react based on the locale. For example, the format for showing the Numbers, Currencies, Dates, and Plurals might be different for another locale.
It is also written as l10n. 10 represents the count of all letters between L and n.
What is Internationalization
Internationalization is the process of making the app localizable. Usually, this process is carried out by the developers who put all their efforts to the make app behave based on the particular locale. Internationalization involves creating multiple locale-based files, importing locale-based assets, and so on.
It is also referred to as i18 n. 18 represents the count of all letters between I and n.

Internationalizing step by step
Following are the instructions that walk you through Internationalizing your Flutter app.
Step 1: Add the flutter_localizations and intl packages to the pubspec.yaml file
dependencies:
  flutter:
    sdk: flutter
  flutter_localizations:
    sdk: flutter
  intl: ^0.17.0
Step 2: In the pubspec.yaml file, add the generate: true This should be inside the last section in pubspec.yaml file. It should look like this:
flutter:

  # The following line ensures that the Material Icons font is
  # included with your application, so that you can use the icons in
  # the material Icons class.
  uses-material-design: true
  generate: true
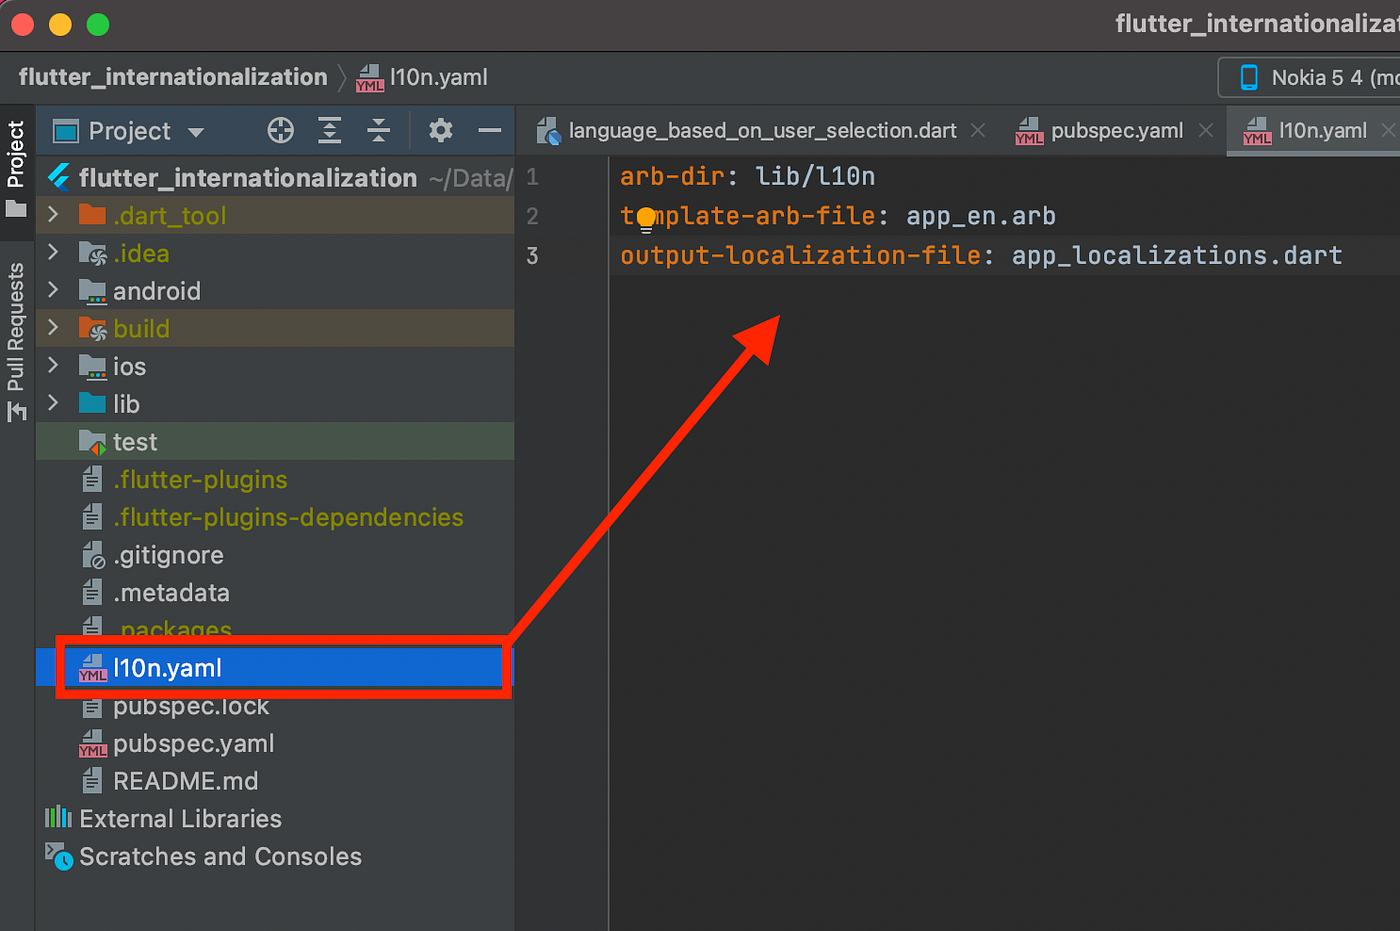
Step 3: Create a new YAML file called l10n.yaml at the root directory of the Flutter project and add the following contents:
arb-dir: lib/l10n
template-arb-file: app_en.arb
output-localization-file: app_localizations.dart
Step 4: Create a new folder named as l10n inside the lib folder. Now add the app_en.arb file with the following contents.
{ "hello": "Hello, How are you?" }
The app_en.arb file contains all the messages that need to be shown when the language is English.
If you want a different message based on locale, you can create a new file under the same l10n folder. Let’s add a greeting message for few other languages.
- Create a new file called
app_de.arband add the below content. The message will be shown when the device locale is German.
{ "hello": "Hallo wie geht's dir?" }
- Create another file called
app_fr.arbwhich should look like below. The message will be shown when the device locale is French.
{
    "hello": "Bonjour comment vas-tu?"
 }

Step 5: Run the app. This will auto-generate some required files needed in the next section.
Step 6: Add the following import statements in the file where you have your MaterialApp widget.
import 'package:flutter_gen/gen_l10n/app_localizations.dart';
Also, In the MaterialApp widget, assign the localizationsDelegates and supportedLocales from the generated files.
It should look like this:
import 'package:flutter/material.dart';
import 'package:flutter_gen/gen_l10n/app_localizations.dart';

 class MyApp extends StatelessWidget {
   @override
   Widget build(BuildContext context) {
     return MaterialApp(
       localizationsDelegates: AppLocalizations.localizationsDelegates,
       supportedLocales: AppLocalizations.supportedLocales,
       home: MyHomePage(),
     );
   }
 }
Step 7: Now you are all set 🎉 Just use the string like this:
Text( AppLocalizations.of(context)!.hello, )
Step 8: Run the app and see the output. Change the language from the settings and notice the changed text.


String with Parameters
Production-level apps can have a lot more complex stuff than just showing simple locale-based messages. The backend may give only important data and the rest lies on the frontend to format and represent the message.
Let’s see how to show a message which tells whether the user is online or not.
First, make changes in the .arb file for all the languages that you are supporting. It should look like this:
//1. app_en.arb
{
    "hello": "Hello, How are you?",
    "user_status": "{usesrname} is {status}",
    "@user_status": {
      "placeholders": {
        "usesrname": {},
        "status": {}
      }
    }
}
//2. app_de.arb
{
    "hello": "Hallo wie geht's dir?",
    "user_status": "{usesrname} ist {status}",
        "@user_status": {
          "placeholders": {
            "usesrname": {},
            "status": {}
          }
        }
}
//3. app_fr.arb
{
    "hello": "Bonjour comment vas-tu?",
    "user_status": "{usesrname} est {status}",
        "@user_status": {
          "placeholders": {
            "usesrname": {},
            "status": {}
          }
        }
}
The user_status accepts the username and statusas parameters. In the respective .arb file, you can prepare a locale-based message format.
Now, you can pass the required data like this:
Text(
  AppLocalizations.of(context)!.user_status('Pinkesh', 'online'),
),
And here’s how it looks:
String with Numbers
Countries may have different ways of representing numbers. For example, when the locale is US English the decimal pattern used is 3,450,200 and for Germany, it looks like this 3.450.200
Let’s add support for the number by making the following changes in the app_en.arb file.
//1. app_en.arb
{
    "hello": "Hello, How are you?",
    "population": "Population in US is {value}",
    "@population": {
      "placeholders": {
        "value": {
          "type": "int",
          "format": "decimalPattern"
        }
      }
    },
}
The key population accepts the number in value. The type of value is defined in the placeholders. It is set to accept the int type and the format would be decimalPattern.
Now, you can use the string message like this:
Text( AppLocalizations.of(context)!.population(1200000), )
You can see how the population number is reflecting in the app:

String with Currencies
Just like numbers, you can also display currency format based on locale. Just replace the decimalPattern with compactCurrency like this:
//1. app_en.arb
{
    "hello": "Hello, How are you?",
    "networth": "xyz's net worth is {value}",
    "@networth": {
    "placeholders": {
     "value": {
       "type": "int",
       "format": "compactCurrency"
    }
  }
 },
}
Showing the currency like this:
Text( AppLocalizations.of(context)!.networth(32000000), )
Output:

Following are the format options that you can have when the type is int:
compact → “1.2M”
compactCurrency → “$1.2M”
compactLong → “1.2 million”
currency → “USD1,200,000.00”
decimalPattern → “1,200,000”
simpleCurrency → “$1,200,000.00”
String with Dates
Showing dates based on locale is essential. Wrong date representation can lead to huge confusion. For example, when the locale is US English date should be displayed in the mm-dd-yyyy format while for the french locale it should be in the format of dd-mm-yyyy.
Here’s how you do it:
//1. app_en.arb
{
    "hello": "Hello, How are you?",
    "on_date": "As of {date}",
    "@on_date": {
     "description": "A message with a date parameter",
     "placeholders": {
       "date": {
         "type": "DateTime",
         "format": "yMd"
    }
  }
 },
}
When the type is set to DateTime it will display the date-time based on the current locale.
Text( AppLocalizations.of(context)! .on_date(DateTime.now()), )
Output:

String with Plurals
If plurals are not handled properly, it can give a feeling of the quality compromised app. The intl package in dart does all the heavy lifting of handling the plurals out of the box.
Here’s the code:
{
    "hello": "Hello, How are you?",
    "nThings": "{count,plural, =0{no {things}} =1{{count} {thing}} other{{count} {thing}s}}",
    "@nThings": {
      "description": "A plural message with an additional parameter",
      "placeholders": {
        "count": {

        },
        "thing": {
          "example": "messages"
        }
      }
    }
}
Inside the placeholder, the count represent the number of items and thing represents the item name.
Now simply pass the item values like this:
Text( AppLocalizations.of(context)!.nThings(2, 'Message'), )
Here’s how it looks:

The finished app looks like this:

The full source code can be found here.
Conclusion
Internationalizing your Flutter app is the key to success. We learned how to internationalize the Flutter app with some practical examples. We also learned how to make an app that adopts different locales.